User Guide
You are here: Operation > The IR remote control > Setting up your IR remote control

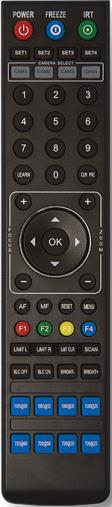
Setting up your remote control

Your remote control requires a bit of initial configuration before it can be used to control your LUMiO 12x.

To set up your remote control:

  1. Ensure your LUMiO 12x is connected to the power supply and that the rear indicator light is a solid red (see Front, back and bottom views for exact location of indicator lights).
  2. Point the remote control at your LUMiO 12x and press the POWER button; your LUMiO 12x powers on and performs a quick 15 second self-configuration (the front indicator light on your LUMiO 12x turns a solid blue when self-configuration is complete – see The remote control for a detailed button layout).
  3. Point the remote control at your LUMiO 12x and press and hold the SET1 button for about 4 seconds until the front indicator light on your LUMiO 12x flashes purple; your LUMiO 12x is now ready to pair to your remote control.
  4. Keep your remote control pointed at your LUMiO 12x and press the CAM1 button; your LUMiO 12x is now fully paired to the remote control.