Quickstart
This sections helps you get started with your LUMiO 12x. You'll learn how to position/connect your LUMiO 12x and set up and operate your remote control.
Before you begin, ensure you have the following:
- Your LUMiO 12x camera
- Your remote control (included with purchase)
- DC12V power supply (included with purchase)
- DVI-I, 3G-SDI, and/or HDMI™ cables and adapters, depending on what kind of video format you'd like your LUMiO 12x to output (not included with purchase).
- A capture appliance, such as Epiphan Pearl or AV.io SDI.
Optionally:
- Screws and mounting panels (if mounting your LUMiO 12x to a wall or ceiling – not included with purchase).
Positioning and connecting your LUMiO 12x (direct connection)
Positioning and connecting your LUMiO 12x is a simple process that involves physically placing your LUMiO 12x for the best view and connecting the required output cables to transfer video output to your capture appliance.

To position and connect your LUMiO 12x:
- Place your LUMiO 12x in the desired location (i.e. on a flat surface, a tripod or mounted to a wall).
- Connect your power supply cable from an electrical outlet to the back of your LUMiO 12x.
- Connect your video output cable (i.e. 3G-SDI, DVI-I) from the back of your LUMiO 12x to your capture appliance.
Next you'll learn how to use the remote control to operate your LUMiO 12x.
Setting up your remote control
Your remote control allows you to control your LUMiO 12x movements and settings but requires a bit of initial configuration before it's ready for use.
To set up your remote control:
Now you'll learn how to issue basic control commands to your LUMiO 12x using the remote control.
| 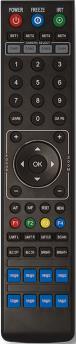 |
Controlling your LUMiO 12x with the remote control
Your remote control allows you to issue basic control commands, such as pan, tilt and zoom adjustments to your LUMiO 12x along with more advanced setting customizations.
To control your LUMiO 12x with the remote control:
- Ensure that your LUMiO 12x is powered on (the front indicator light should be solid blue – see Front, back and bottom views for exact location of indicator lights).
- Press the CAM 1 button you mapped to your LUMiO 12x in Setting up your remote control.
- Point the remote control at your LUMiO 12x and press the +/- buttons to control the focus (manual focus must be enabled) and zoom settings, and press the arrow buttons to control the pan and tilt settings.

Your LUMiO 12x is now all set up and ready to capture video content!
What's next?
Now that you've set up your LUMiO 12x, configured your remote control and learned how to control your LUMiO 12x, you can learn more about additional operation and configuration options. You can look at topics such as:
- Front, back and bottom views to learn about the visual features of your LUMiO 12x, including all ports and connectors.
- The remote control for a detailed guide on all buttons on the remote control, how to set presets and how control your LUMiO 12x.
- The OSD menu for instruction on how to change settings on your LUMiO 12x using the on screen display (OSD) menu.
- RS-232 serial port communication for an overview of how to operate your LUMiO 12x using VISCA, PELCO-P and PELCO-D serial port communication protocols.
Refer to the table of contents for a complete list of the topics covered.
