Stream to your Twitch channel page
Webcaster X2 streams 1280×720p at 30 fps with a bit rate of 2 Mbps to Twitch by default. From the Preferences you can change Webcaster X2 to stream at a higher resolution (for example, 1920×1080p at 30 fps) or a lower one. You can also select a different bit rate if you want. However, live streaming at a higher resolution and bit rate requires more upload bandwidth. To change the default settings on Webcaster X2, use a connected HDMI monitor and mouse.
For Twitch broadcast specifications, see: stream.twitch.tv
To stream to a third-party app, you need:
- A Twitch account and channel already setup, See the online help in Twitch for information on how to setup a Twitch channel, enter a title for your live broadcasts in Twitch, and add a description.
- Your HDMI camera to stream
- Your Webcaster X2
-
An Internet connection with a minimum of
- An HDMI display that supports 1080p video
- A USB mouse
- (Optional) A USB keyboard
Note: If Webcaster X2 is already paired to your Twitch account, you don't require an external HDMI monitor and mouse. Simply click the multi-function power button on Webcaster X2 to start and stop streaming to your Twitch channel page.
- Connect everything and turn on Webcaster X2.
- Connect your HDMI camera to the HDMI IN port.
- Connect your display to the HDMI OUT port.
- Connect your Ethernet cable to the Ethernet port. (Or configure Wi-Fi after boot up.)
- Connect your mouse to one of the USB ports.
- (Optional) Connect your keyboard to another USB port.
- Turn on Webcaster X2 by plugging in the power cord. Webcaster X2 boots up.
- If the Twitch logo and IP address of Webcaster X2 aren't showing on the front display, double-press the multi-function power, see Choose the platform app you want.
- Follow the instructions provided by the third-party app to pair your Webcaster X2 encoder to the app.
- Pair Webcaster X2 to your Twitch account. Do one of the following:
- Using a connected HDMI display and mouse, click the Pair/Unpair icon
 that appears along the bottom of the menu overlay and click Auth with password in the pop up window.
 - Enter your Twitch login credentials and click Log In. Click Authorize when prompted to allow Webcaster X2 to stream to your Twitch account.
- In your web browser, enter the IP address that's showing on the front display of Webcaster X2 to go to the encoder's Pairing page. For example, enter the URL http://10.1.1.10
- Paste your Twitch stream key in to the field on Webcaster X2's Pairing page and click Submit. You're now ready to start streaming to your Twitch channel page using Webcaster X2's default settings.
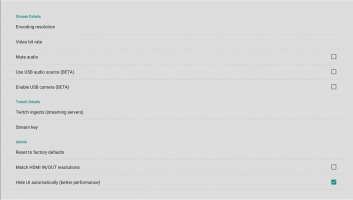
- (Optional) Click the Preferences icon
 at the lower right corner of the main screen on Webcaster X2 to change the default live stream settings. When you're done, click the Right mouse button to return to the main screen. You can:
 Change the Stream Details.
- Encoding resolution: Select the resolution for your live stream. The default resolution is 1280×720p.
- Video bit rate: Select the bit rate for your live stream. The default bit rate is 2000 kbps.
 Change the Twitch Details.
- Twitch ingests (streaming servers): By default, Webcaster X2 chooses the closest Twitch streaming server automatically. You can select a specific Twitch server from the list of available servers.
- Stream key: You can optionally type the Twitch stream key here rather than pasting it on the Pairing web page for your Webcaster X2. Entering a different stream key while live streaming immediately stops the existing stream and a new stream is automatically initiated. Content loss occurs between the time it takes for the existing stream to end and the new stream to start.
If you change the encoding resolution, the video bit rate, or the Twitch server while you're streaming live, the changes are not applied until after you stop the live stream.Other optional features that you can set from the Preferences screen, such as enabling the USB webcam (Beta) feature or hiding the UI automatically for better performance (enabled by default), are documented in the Your encoder section of the Webcaster X2 online user guide. -
When you're ready to start streaming, do one of the following. The green LED on Webcaster X2 flashes while you're broadcasting live.
- Click the Start icon
 .
.
- Press the multi-function power button once.
- Press Space on a connected keyboard.
During your broadcast, click the left mouse button to show or hide the Webcaster X2 menu overlay. - Click the Start icon
- To stop your live broadcast, you can click the Stop icon
 , press the multi-function power button one more time, or press Space on a connected keyboard. The green LED on Webcaster X2 stops flashing when live broadcasting stops.


 ™ and ©