Automatic File Upload to a USB storage device
Transfer recordings to a USB storage device automatically when you select an external USB device as the AFU protocol transfer type using the Admin panel.
Prerequisites
- A properly formatted USB device must be connected to a USB port on the Pearl device.
- Channels and/or recorders are already added for AFU, see Set channels and recorders to include in AFU.
- AFU is enabled and the parameters configured, see Enable AFU, schedule, and set options.
Configure AFU upload to a USB storage device using the Admin panel
- From the Automatic File Upload configuration page, select External USB Drive as the protocol transfer type. If your Automatic File Upload setting conflicts with your new USB device setting, a message is displayed. Click the fix it link and click Apply.
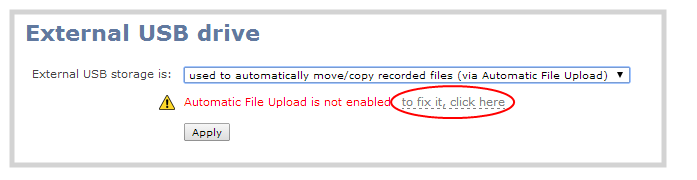
The fix it link disables any other type of automatic file upload you have configured. When you are done with USB uploads, return to the Automatic File Upload configuration page and reconfigure your AFU settings.
- (Optional) Select Create a subfolder for each channel to have recordings organized by channel.
- Click Apply.
Manually copy recordings to USB
You can manually copy recordings to a USB storage device that is connected to Pearl Nano. This procedure is separate from automatic file upload and does not need any pre-configuration in the automatic file upload page.
The following table describes the options available when manually copying recordings to a USB storage device.
One-Time Move/Copy File Transfer Options
| Name | Description |
|---|---|
| create subfolder with serial number (<serial>) | If checked, the transfer process creates a sub-folder with the system’s serial number on the USB drive. This is useful if you are using the same drive to collect recordings from multiple systems and want to know which system they came from. |
| create subfolder for |
If checked, the transfer process creates a sub-folder for the channel into which the files are copied (within the subfolder for the serial number, if that option is also selected). |
| File already exists |
Choose the action to take if a file with the same name already exists in the copy location:
|
Manually copy recorded files to a USB device using the Admin panel
- Login to the Admin panel as admin, see Connect to the Admin panel.
- From the Configuration menu, select External USB Drive link. The External USB Drive configuration page opens.
- Select used to manually move/copy selected files via the Admin panel and click Apply.

If a conflict is reported regarding the Automatic file upload, click Fix it or go to the Automatic File Upload configuration page and disable automatic file upload or switch to a non-USB based upload type.
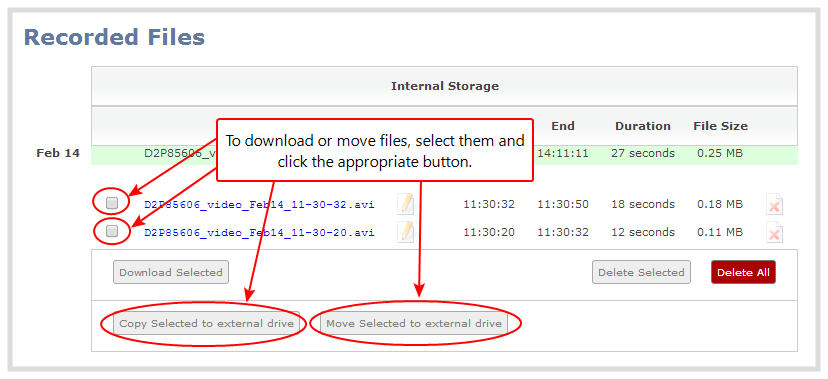
- Insert your USB storage device into the USB port on Pearl Nano, then click Recording from the Channel menu in the Admin panel. The Recording page opens.
- Check the files you want to download and do one of the following:
- Click Copy Selected to external drive to copy the files to the USB drive.
- Click Move Selected to external drive to move the files and delete them off of Pearl Nano.
In this example, the first file is currently recording and cannot be downloaded.
- Follow the steps to Safely eject USB storage device when you're done.
View file transfer to USB device status and cancel using the Admin panel
During a file transfer to an External USB drive, you can monitor the file transfer progress and cancel the file transfer using the Admin panel. You can only cancel the transfer of a file while it is in progress.
For other options to view the USB file transfer progress, see View AFU and file transfer progress.
- While the file transfer is in progress, select External USB Drive link from the Configuration menu in the Admin panel. The External USB Drive configuration page opens.
- View the current file transfer status under the Status section. To cancel the current file transfer, select Cancel and confirm when prompted. The option to cancel only appears while the file transfer is in progress. The file that is highlighted in green is currently being transferred.

View available USB storage space
When you insert a USB storage device into a USB port and select an External USB Drive action other than ignored (i.e. manual copy, automatic copy, etc), the total and free space are calculated and displayed in the Admin panel.
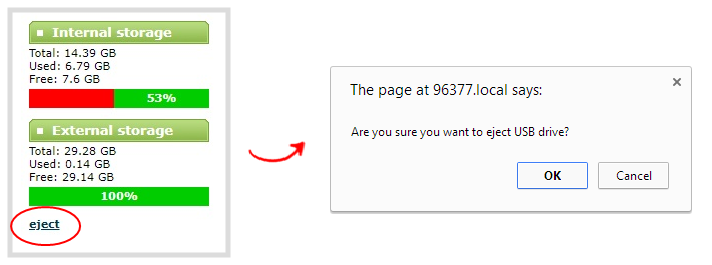
When you insert your USB storage device into an available USB port, an External storage usage information tab appears at the bottom of the menus panel in the Admin panel.
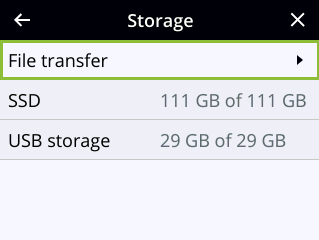
You can also view the storage capacity when you select Storage using the front screen menu. A USB storage device must be connected to see the USB storage listed.
Safely eject the USB storage device using the Admin panel
When you're done saving recordings to the USB storage device, you can safely eject it using the link at the bottom of the Admin panel page.
- Log in to the Admin panel as admin, see Connect to the Admin panel.
- At the bottom of the menus panel, click eject and click OK when prompted.
It's now safe to disconnect the USB storage device from Pearl Nano.
