Configure HTTPS
You can configure Pearl Nexus to use HTTPS for secure, local network access to the Admin panel, as well as for viewing the live channel preview stream on the local network using the Live broadcast URL.
The default HTTP port 80 redirects traffic to the default HTTPS port 443 when HTTPS is enabled. If the default ports used by the Pearl device are not available on your network, you can change them using the Admin panel, see Change the HTTP/HTTPS port values.
Custom applications that use the Pearl device HTTP API should continue to work if you configure the Pearl device for HTTPS.
A default, self-signed certificate from Epiphan Video comes preloaded on the Pearl device. You can upload and delete your own certificate and private key. However, you cannot delete the default self-signed certificate that comes preloaded on the Pearl device.
If you upload your own self-signed certificate and private key, ensure they're PEM encoded. Certificates can either include the private key or be separate files.
If you attempt to access the web-based Admin panel using a web browser and the required security certificate isn't found in the list of certificates loaded on the Pearl device, a warning message appears stating that the device isn't trusted. You can choose whether to proceed and connect to the Pearl device's web-based Admin panel without the security certificate authentication or cancel the connection.
If the Epiphan Video self-signed certificate is selected, your web browser may warn of an untrusted certificate when you try to access Pearl's web-based Admin panel. You can dismiss the warning and continue to the Admin panel for your device.
Configure HTTPS and upload a self-signed certificate using the Admin panel
- Login to the Admin panel as admin, see Connect to the Admin panel.
- From the Configuration menu, select Security. The Security configuration page opens.
- Under HTTPS configuration, check Secure connection (HTTPS).
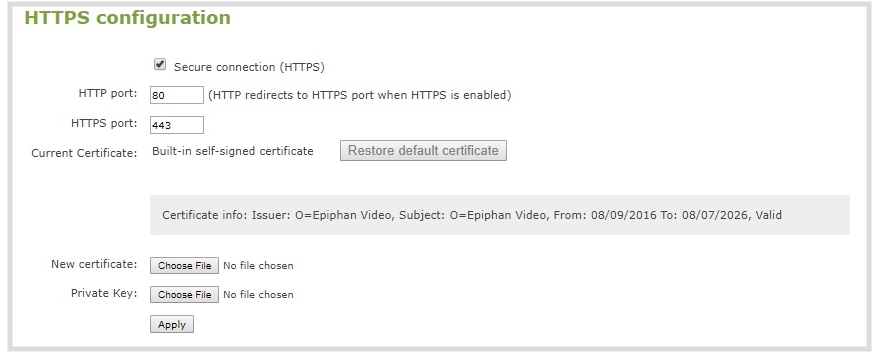
- (Optional) Change the default HTTP and the HTTPS port numbers. Consult your network administrator.
- (Optional) Upload a new certificate and private key as required. You can request those from your network administrator.
If the required certificate isn't included in the list of certificates on the Pearl device when you try and connect to the Pearl device using a web-browser, you'll receive a warning that the device isn't trusted.
- Click Apply when you're done.
- Reboot your Pearl device when prompted. After the system has finished rebooting, log back in to the Admin panel as admin and verify that all changes were applied.
If you need to delete the certificate you uploaded and the private key, click Delete certificate, or click Restore default certificate.
