Storage capacity and maintenance
Pearl Nexus has
Check media storage capacity
Pearl Nexus has
Check media storage capacity using the Admin panel
- Login to the Admin panel as admin or operator, see Connect to the Admin panel.
- From the Configuration menu, select Media. The Media configuration page opens with the amount of capacity listed at the top of the page.
Check internal storage space
You can check how much internal storage space is available on Pearl Nexus using Using the Admin panel . Pearl Nexus
It’s good practice to monitor how much free space is available. If the amount of available storage is low, you can always remove some of the recorded files, see Manage recorded files and Automatic file transfers.
Disk space can also be checked using Epiphan Live, see Configure Dashboard panels.
Check internal storage space using the Admin panel
- Login to the Admin panel as admin or operator, see Connect to the Admin panel.
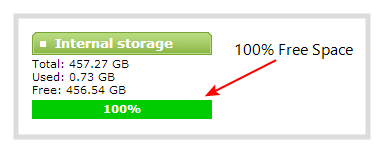
- View the Internal Storage section at the bottom of the menu panel. The bar will be mostly green if there is lots of space left, or mostly red if storage space is nearly full.

Perform disk check
A disk maintenance schedule is used to periodically check the system storage drives for errors. If you prefer, you can run the disk check manually at a time that is convenient for you.
Running the disk check manually resets the timers for the scheduled disk check (i.e. next check won’t happen automatically until either the number of restarts or months passes).
If the system is recording when you start a disk check, it will stop recording and resume after the check is complete. Frames presented during the disk check are not part of any recording.
Start a manual disk check using the Admin panel
- Log in to the Admin panel as admin, see Connect to the Admin panel.
- From the Configuration menu, select Disk Check. The Disk maintenance page opens.
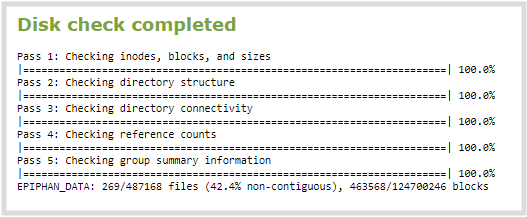
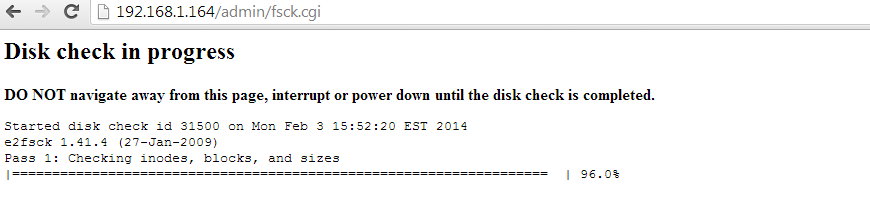
- Select Check Now to start the process. A new page showing the progress of the disk check opens.
Do not interrupt power to the system during the disk check.
- When the disk check is complete, the main page returns and a summary is shown.