Add an audio source to a layout
You can add multiple audio sources to the layouts for a channel using the Admin panel. By default, audio is enabled for the channel on the channel's encoding page.
Pearl-2, Pearl Mini, and Pearl Nexus - Each layout can have the same audio sources in them or you can choose different audio sources. An audio source has the same gain no matter how may layouts the audio source is added to, or if you've added just the one audio source or several audio sources to the same layout.
Important considerations
- For SRT
- The XLR-B audio inputs and the RCA audio inputs are linked within Pearl-2. The XLR L/R audio inputs and the RCA L/R audio inputs are linked within Pearl Nano. If you use both at the same time, their audio is mixed. If the two audio sources share the same audio signals, the common audio signals are amplified. To avoid this, you can disable one or the other audio port, see Assign audio sources to an input.
- The Pearl Mini and Pearl Nexus audio from the connected HDMI video sources (HDMI-A or HDMI-B) is automatically selected as the audio source for the HDMI-A and HDMI-B channels on Pearl Mini and Pearl Nexus by default.
- If a channel is selected as the video source for a layout, the corresponding audio for that channel is added automatically.
- You can add multiple audio sources to the same layout. However, if the two audio sources share all or some of the same audio signals, then the common audio signals are amplified.
- Selecting multiple loud audio sources in the same layout may cause audio clipping on that layout. Before going live, always check the volume levels for the layout and adjust the volumes at audio sources to avoid clipping, see Adjust audio gain and delay.
- If audio encoding is not configured for a channel, no audio signal is processed or sent with the video content when recording, streaming, or confidence monitoring, see Configure audio encoding.
- If an audio source is added to a layout and then the audio device is disconnected from the input port on the Pearl device, some residual noise may be detected in the layout. Remove the audio source from the layout.
- Pearl supports many different audio devices, including dynamic and condenser microphones, passive and active electret microphones, professional line-level audio mixers, and consumer line level sources like mobile phones and audio players. For details about the different audio ports and if audio gain is recommended when connecting different types of audio devices, see Pearl Nexus AV inputs andSelecting an audio source for Pearl.
Add an audio source to a layout using the Admin panel
- Login to the Admin panel as admin, see Connect to the Admin panel.
- From the Channel(s) menu, select the channel and click Layouts. The custom layout editor opens.
- In the Layouts list that appears at the top of the page, click a layout's row to select that layout.
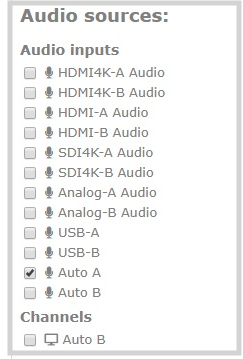
- Check the audio source that you want to use for the layout and click Save.
What's Next
You can check the audio encoding settings for your channel and ensure that audio is enabled, see Configure encoding.
To adjust the gain for an audio input source, see Adjust audio gain and delay.
