Set up the video output port using the Admin panel
You can send a channel or a video source to the video output port using the Admin panel. You can also adjust the video output resolution, aspect ratio, and choose to include audio. The video output port frame rate is set automatically to the channel's configured frame rate for that video source.
When outputting a channel that has audio or a video source with embedded audio, you can adjust the volume and choose to include the audio meter. The audio meter is set to a fixed size of 15% of the width (or height if displayed horizontally) of the display.
The HDMI pass-through port only displays the identical video signal with audio that is received at the HDMI IN port on Pearl Nano.
Important considerations
To select the video you want to appear on the output port using see About video output ports.
Set up a channel or video source to display on the video output port using the Admin panel
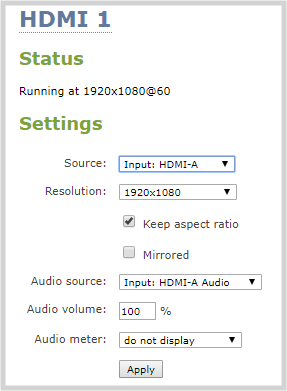
- Login to the Admin panel as admin, see Connect to the Admin panel.
- From the Output ports menu, click the output port ( ). The video output port configuration page opens.
- In the Source field, select a channel (prefixed by the word Channel) or a video source (prefixed by the word Input).
- In the Resolution field, select the resolution for the video output port.
| Device | Value | Description |
|---|---|---|
| All | Same as source | Set the output to the same resolution as the channel or video source. If that resolution is not supported by the display, the video output port will negotiate a new resolution with the display (generally this ends up being the display's default resolution). |
| All | Destination default | This is the default value. Each display has a preferred resolution, and when you choose this setting, the video output port will use the display's default resolution. |
| Pearl Nano |
1024×768, 1280×720, 1280×960, 1360×768, 1400×1050, 1920×1080 |
Choose a specific resolution for the output port. |
- Do one of the following:
- Check Keep aspect ratio check to have the system maintain the correct aspect ratio. If the aspect ratio is different between the source and the chosen display aspect ratio, black bars are automatically inserted at the top and bottom or left and right sides of the video.
- Uncheck Keep aspect ratio check to have the system stretch the source to fit the aspect ratio of the display.
- For a channel, do the following:
- Check Enable audio to include audio in the output. Leave this unchecked for no audio with the video.
- (Optional) For a channel with audio enabled, adjust the volume. Enter a value from 0 to 100 percent in the Audio volume field.
- (Optional) For a channel with audio enabled, choose whether or not to display the audio meter from the Audio meter drop down.
- If displaying the audio meter, select horizontal or vertical from the Audio meter orientation drop-down menu to change the orientation of the displayed audio meter.
- For an input source, do the following:
- Select an Audio source from the drop down list.
- (Optional) Adjust the volume. Enter a value from 0 to 100 percent in the Audio volume field.
- (Optional) Choose whether or not to display the audio meter from the Audio meter drop down.
- If displaying the audio meter, select horizontal or vertical from the Audio meter orientation drop-down menu to change the orientation of the displayed audio meter.
- Click Apply.
The audio meter can be displayed even if you are not playing audio over the video output port (i.e. even when the Enable audio check box is not checked).
