Configure a static IP address
There are two ways you can set up a Pearl device to use a static IP address:
- From the Interfaces tab of the Network configuration page using the Admin panel.
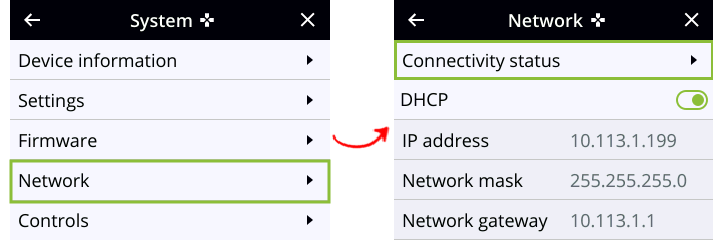
- Pearl Nano: From the front screen menu when you select System > Network. You can also see the IP address when you navigate to the System status screen using the front panel control interface.
TIP: Using the device screen, you can choose to apply a configuration preset that contains a static network IP. See Configuration presets.
Only IPv4 addresses are supported. Pearl Nano does not support IPv6.
Configure a static IP address using the Admin panel
- Log in to the Admin panel as admin, see Connect to the Admin panel.
- From the Configuration menu, select Network and the Interfaces tab. The Network Interfaces page opens.
- For an interface, toggle the Use DHCP switch and enter your networking information in to the required fields. Click Save when you're done.
Static IP Address Fields
| Label | Description |
|---|---|
| Use DHCP | Toggle the switch to choose between DHCP or static IP address configuration. |
| IP Address | The internet protocol address (IP Address) to assign. Obtain this from your network administrator. Pearl Nano supports IPv4 addresses. They do not support IPv6 addresses. |
| Network Mask | Also called the subnet mask, this value denotes a range of IP addresses. Obtain this from your network administrator, from another computer on the same subnet, or calculate the value using an online subnet calculator. |
| Default gateway | The network node that serves as an access point to the rest of the network. This value cannot be blank unless you are using DCHP. Specify the system’s IP address if you don’t have a default gateway on your network. |
| DNS Server | The domain name system server (DNS server) translates human-readable hostnames into corresponding IP addresses. Specify the system’s IP address if you don’t have a DNS server on your network. This value cannot be blank unless you are using DHCP. |
| MTU Size | The maximum transmission unit (MTU) specifies the maximum packet size for transfer on the network. The default value is 1500, which is the largest value allowed by Ethernet at the network layer. It’s best for all nodes in your network to use the same value. Only change the MTU value if you know that other nodes use a different value. |
The default gateway and DNS Server fields cannot be left blank. If you do not have a default gateway or a DNS server for your network, enter the static IP address in those fields.
- Reboot the Pearl device when prompted. From the Configuration menu, select Maintenance and click Reboot Now on the Maintenance page.
- After the system has finished rebooting, use the new IP address to log back in to the Admin panel as admin and verify that all changes were applied.
Configure a static IP address using the front screen menu on Pearl Nano
- Press the left arrow key repeatedly on the control key interface until the Menu screen displays.
- Use the arrow and check mark keys to select System. Then from the System screen, select Network to open the Network screen.
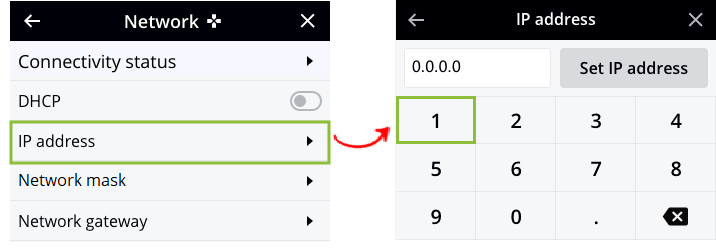
- From the Network screen, use the arrow keys to highlight DHCP and press the check mark key to toggle the switch off. The network addresses disappear from the screen.
- Use the arrow and check mark keys to select IP address. The screen to enter a static IP address opens.
- Use the arrow and check mark keys to enter a static IP address, then select Set IP address. If you leave the IP address screen without setting the IP address, the IP address you entered is not assigned to the Pearl device.
- Reboot the Pearl device to apply the network changes. Return to the System screen and use the down arrow key to scroll down until Reboot appears. Then select Reboot using the check mark key and select Reboot now when prompted.