Connect an NDI|HX source
NDI® lets you to transmit and receive low latency video over Gigabit Ethernet networks. Pearl Mini and Pearl Nexus support ingest of high efficiency NDI|HX and do not support Alpha channel. Any mention of using NDI with Pearl Mini or Pearl Nexus in this user guide is referring to NDI|HX inputs.
Video and audio can come from a variety of NDI|HX sources, including:
- Remote NDI|HX enabled PTZ cameras
- Any NDI|HX unaware HDMI/SDI source using an NDI|HX converter
- NDI|HX output from IOS and Android mobile devices running the NewTek NDI camera app
Pearl Mini discovers and lists all available NDI|HX resources on the same network. Simply choose which NDI|HX source you want from a list. Optionally, you can search for specific NDI|HX sources by name and NDI|HX group. You can also discover specific NDI|HX devices installed on different networks, subnets, and on networks that have mDNS disabled. Pearl Mini now also supports adding an NDI discovery server to the network configuration to help discover NDI|HX sources on the network, see Enable an NDI discovery server.
Important considerations
- For NDI|HX to work properly, network ports 49152 to 65535 need to be open for two-way traffic. Contact your network administrator for assistance.
- The network discovery port 5557 on Pearl Mini must be enabled (default), see Disable the network discovery port.
-
Pearl Mini supports up to three 1920×1080@30 fps inputs simultaneously. Up to two of those 1080@30 inputs can be from an NDI|HX source.
-
To connect an NDI|HX source to Pearl Mini:
- Log in to the Admin panel as admin, see Connect to the Admin panel.
- From the Inputs menu, click Add input. The Add input page opens with all available NDI|HX resources listed.
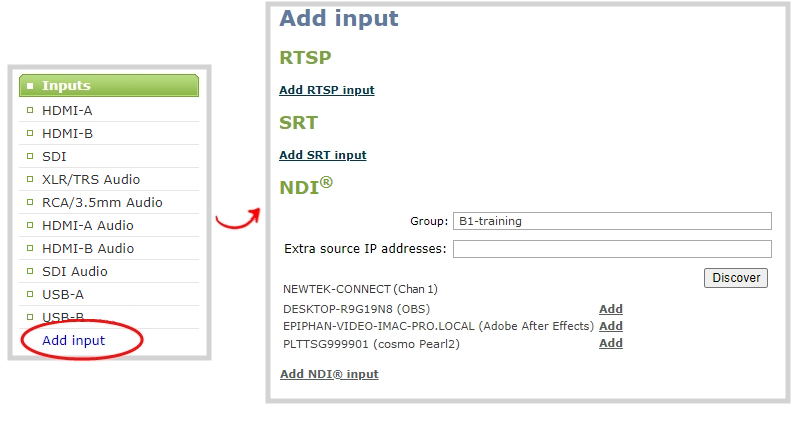
- Do one of the following:
- If the NDI|HX resource is listed, select Add beside an NDI|HX resource to select it. The new NDI|HX input details page opens.
- If the NDI|HX resource is assigned to an NDI|HX group, enter the group name and then click Discover to see a list of available NDI|HX resources in that group. Select Add beside an NDI|HX resource to select it.
- If a remote NDI|HX resource is on a different network or subnet than Pearl Mini, or the network has mDNS disabled, enter the IP address of the remote NDI|HX resource in the Extra source IP addresses field, then click Discover. Use a comma to separate multiple IP addresses. Select Add beside an NDI|HX resource to select it.
- Alternatively, if Pearl Mini is configured with the IP address of an available NDI|HX Discovery server (check Enable an NDI discovery server), Pearl Mini will query the discovery server for available NDI|HX sources registered with the NDI|HX Discovery Server.
- If you want to add an NDI|HX input to Pearl Mini without selecting an NDI|HX resource, click Add NDI input. The new NDI|HX input is added and a blank NDI|HX input details page opens. You can search for and assign an NDI|HX resource to it later.
- (Optional) On the NDI|HX input details page, check Ignore timecode to configure Pearl Mini to ignore any timecode information in the NDI|HX signal. This is useful if the NDI|HX source doesn't send a timecode or if the source's timecode is unstable.
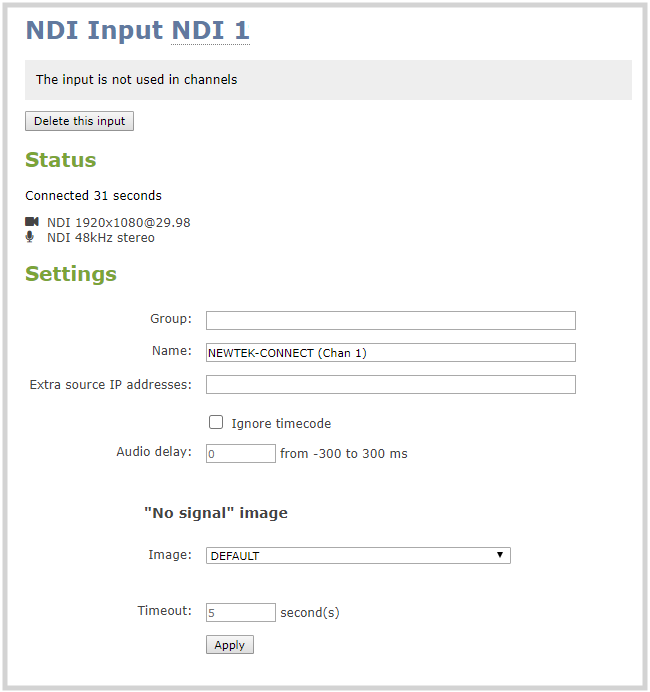
- Click Apply.
After your NDI|HX source is connected, you can view basic video and audio signal information and packet loss statistics for the source under the Status header at the top of the page. Any warnings or errors associated with the NDI|HX signal are also displayed there.
