About Legacy RS-232 / serial port commands
Your Pearl system has a Legacy RS-232 API that uses an RS-232 / serial port control interface for integration with existing control room and board room equipment.
Important considerations
- Each command sent over RS-232 must be terminated with a line feed (LF) character (ASCII code 10). Make sure that your software adds the line feed to each command.
- Ensure your terminal program is configured for UTF-8, which is required if any data includes non ASCII characters.
- For values with spaces, enclose the value in quotation marks. For empty values, use empty quotation marks with nothing between.
- You must always follow a SET command in RS-232 with the SAVECFG command. Otherwise the new configuration setting(s) will not take effect. See the SET examples that follow.
- The
publish_enabledon/off command does not work on multiple publish destinations and only starts/stops the first instance. - Pearl Mini and Pearl Nano require an RS-232 to USB serial adapter cable (not included).
- Since Pearl Nano is a single-channel encoder, the channel index number is always 1. The layout identifier is also always 1.
- Pearl Nano doesn't support multiple channels, multiple layouts, recorders, touch screen, and the Motion JPEG codec. Commands related to these are either ignored (for example, you cannot delete the channel or create a new layout on Pearl Nano), or applied to only a single target item, such as the single channel or layout on Pearl Nano.
For a complete list of supported SET and GET parameters, see Configuration keys for third party APIs. To connect the RS-232 cable and configure RS-232, see Connect and configure the RS-232 port.
The following examples show how to use RS-232 commands to control your Pearl system:
To start recording on channel 2:
START.2
To stop recording on channel 2:
STOP.2
To start the first stream on channel 1:
For streaming, you must define the channel and the logical stream. Pearl Nano only has one channel. The first logical stream created is /stream0/ and the second logical stream would be /stream1/. To start the first stream, stream0, in channel 1, use the following command:
SET.1:0.publish_enabled=on
SAVECFG
To stop the first stream on channel 1:
For streaming, you must define the channel and the logical stream. Pearl Nano only has one channel. The first logical stream created is /stream0/ and the second logical stream would be /stream1/. To stop the first stream, stream0, in channel 1, use the following command:
SET.1:0.publish_enabled=
SAVECFG
To start recording on all channels and recorders:
START
To get the value of the frame size (resolution) for channel 1:
GET.1.framesize
To set the frame size (resolution) on channel 1, enclose the parameter in quotes to preserve the spaces:
SET.1.framesize="640 x 480"
SAVECFG
To enable broadcasting audio on channel 2:
SET.2.audio=on
SAVECFG
To disable broadcasting audio on channel 2:
SET.2.audio=""
SAVECFG
Connect and configure the RS-232 port
To connect your control equipment to Pearl-2, you need a standard RS-232. For Pearl Mini, Pearl Nexus, and Pearl Nano, use a null-modem cable and a USB to RS-232 serial adapter cable (not included). Only certain adapter chipsets are supported depending on the firmware installed.
Firmware 4.23.1 and older:
-
RS-232 adapters with the Prolific PL2303RA chipsets that support TX and RX
-
Prolific PL2303RA is a deprecated chipset and it is suggested to update your Pearl firmware and use the FTDI FT232R adapters listed below
Firmware 4.24.0 and newer:
-
RS-232 adapters with FTDI FT232R chipsets that support TX and RX
-
Recommended adapters:
Connect the serial port cable
- Attach the RS-232 cable to the control interface.
- For Pearl-2, connect the RS-232 cable to the back of the system.
- For Pearl Mini, Pearl Nexus and Pearl Nano, connect the USB to RS-232 serial adapter to the null-modem cable and then connect the USB to RS-232 serial adapter to any of the USB ports on the system.
The only configuration available for the serial port is flow control. Flow control changes the rate of data transfer over the cable. Some communication settings are static and cannot be changed. The static settings are:
- Baud rate set at 19200
- Parity set to none
- Stop bits set to one
Configure serial port flow control
- Log in to the Admin panel as admin, go to:
http://<Pearl_ipAddress>/admin - From the Configuration menu, click Serial Port . The serial port configuration page opens.
- Select Hardware, Software, or None from the drop-down menu.
Serial Port Flow Control Options
| Label | Description / Options |
|---|---|
| Hardware | A hardware handshake is used for flow control, which is also called RTS / CTS flow control. See the manual for your control terminal to check if a hardware handshake is needed. |
| Software | A software handshake that uses XON/XOFF characters to control the flow of data. See the manual for your control terminal to check if a software handshake is needed. |
| None | No flow control is used. Only select this if your control terminal doesn't use a handshake. |
- Click Apply.
Controlling your Pearl system with RS-232
You can use the null-modem cable and your control terminal software to issue commands to your Pearl system, such as when to start or stop recording, and to retrieve or set the value of certain parameters.
Each command sent over RS 232 must be terminated with a line feed (LF) character (ASCII code 10). Make sure that your software adds the line feed to each command.
Some commands require a channel or recorder name as an argument. In those commands, the channel or recorder name is separated from the command name by a period. The channel name value can be either the name or the index of the recorder or channel. Use of the index is recommended.
A channel's index number is located in the Channels Menu using the Admin panel. The channel index number turns red to indicate it is recording. For example, to address this channel using RS-232 commands, use the index 1.
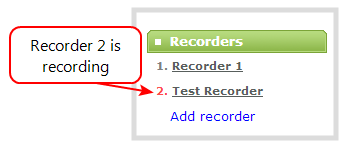
For recorders, combine the recorder's number with the prefix m. In the following example, the second recorder's index is 2. To address this recorder using RS-232 commands, use the index m2.
The following table describes the supported RS-232 commands.
Supported RS-232 Commands
| Command Name | Description |
|---|---|
| Recording Commands | |
|
START.<channel> START.<recorder> |
Starts recording for the specified channel or recorder. This can alternatively be accomplished with the following set commands: SET.<channel>.rec_enabled=on
If the channel is already recording, the current recording is continued. |
| START |
Starts recording for all channels and recorders.
There is no RS-232 command to restart recording. If recording is already active when the start command is issued, the recording continues. |
|
STOP.<channel> STOP.<recorder> |
Stops recording for the specified channel or recorder. This can alternatively be accomplished with the following set commands: SET.<channel>.rec_enabled=""
|
| STOP | Stops recording for all channels and recorders. |
| Configuration Commands (see Configuration keys for third party APIs for available keys) | |
|
GET.<channel>.<key> GET.<recorder>.<key> |
Gets the saved value of a given parameter for the specified channel or recorder. |
|
SET.<channel>.<key> SET.<recorder>.<key> |
Sets the value of a given parameter for the specified channel or recorder. The value is not saved until the SAVECFG command is sent. |
| Global Variable Commands | |
| VAR.GET.<name>1 | Gets the specified global variable, where <name> is the unique name for each variable. |
| VAR.SET.<name>2=<value> |
Saves the global variable modified by the SET command, where <name> is the unique name for each variable and <value> is the text/character content stored in each variable. Example:
where <name> is gpsvar0 and <value> is N103 68201 W765 29712.
|
| Status Commands | |
|
STATUS.<channel> STATUS.<recorder> |
Reports the recording status of the specified channel or recorder. Status is one of:
|
| STATUS |
Reports the recording status of each channel and recorder. Status is one of:
|
| FREESPACE | Reports the free storage space, in bytes. |
|
RECTIME.<channel> RECTIME.<recorder> |
Reports the elapsed recording time in seconds for the current file on the specified channel or recorder. |
| RECTIME | Reports the elapsed recording time in seconds for the current file on each channel. |
1Variable <name> can be up to 32 alphanumerical characters long including underscores. Name must start with a letter or underscore.
2If the equal sign "=" is omitted, VAR.SET assigns an empty value.
Pearl Legacy API returns a status change message whenever changes are made.
RS-232 Status Changed Messages
| Command Name | Description |
|---|---|
| STATUS.<channel> <status> |
Provides the status of the recording service for the channel as either:
The Uninitialized status is sent when there is an internal error. Check the system for more details. |
Global variable RS-232 commands for custom layouts
You can use RS-232 commands to create global variables embedded in a custom layout as responsive text overlay elements. For information about text overlays and adding a global variable into a custom layout, see the user guide for your Pearl system.
Important considerations
- Each system variable must have its own unique name.
- System variable names and variable values are case sensitive.
- Each variable name must start with a letter or underscore and can be up to 32 alphanumeric characters length, including underscores.
- Setting an empty variable name clears the variable value.
- Ensure your terminal program is configured for UTF-8; otherwise, any special characters used in the RS-232 global variable command will cause the RS-232 command string to be ignored.
- There is a limit of 1024 total unique system variables per system.
- System variables can be used in text labels across any number of channels.
- System variables are considered volatile data and are erased when the Pearl system reboots.
- You can set only one variable at a time using the RS-232 SET command.
- Quotes are not ignored. For example, the following RS-232 SET commands are different:
- VAR.SET.myname=some value
- VAR.SET.myname="some value"
RS-232 GET / SET variables – syntax and examples
A get command retrieves a variable using the syntax VAR.SET.<name>, where <name> is the unique name for each variable up to 32 alphanumerical characters long including underscores. Name must start with a letter or underscore.
RS-232 GET example:
Example: VAR.gpsvar1
A set command saves a variable value using the syntax VAR.SET.<name>=<value>, where <name> is the unique variable name, and <value> can be up to 32 alphanumerical characters including underscores.
RS-232 SET example:
Example: VAR.SET.gpsvar1=N103 68201 W765 29712
If <value> contains spaces, quotes must not be used.
To erase a previously set variable, set the value with an empty space
If the equal sign "=" is omitted, VAR.SET assigns an empty value.
