Set up chroma key for a green screen video source
A common use of chroma keying is to use a green screen and then replace the green background with another video or still image.


Your chroma key source can come from a video camera or an effects computer connected to Pearl-2. The background you use can be from another video source, a still image that you've uploaded to Pearl-2, or from an effects computer.
This example shows two camera sources connected to Pearl-2. The green screen appears in the video source connected to HDMI-A and the office background is from HDMI-B.

Configure chroma keying for green screen using the Admin panel
- Login to the Admin panel as admin, see Connect to the Admin panel.
- Follow the steps in Set up chroma key for a green screen video source to create a custom channel.
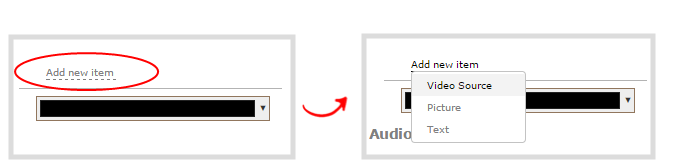
- From the custom layout editor, click Add new item and select Video Source.
- Click Source and select the video source that you want showing through the background of your chroma key colored areas.
- In the layout editing area, click and drag to position the video. See the note after this procedure for positioning techniques.
For best results, select the Keep aspect ratio when scaling checkbox from the Source settings box.
- Click Add new Item again and add the video source that has the green screen image.
- Click the Crop button and crop your green screen video source in the pop-up crop editing window. Click OK when your done to return to the custom layout editor.

Cropping the green screen video source helps optimize the performance of Pearl-2.
- In the layout area, position the green screen video source over top the other video source. To optimize performance, avoid scaling the green screen video source if you can.

- With the green screen video source selected, check Enable Chroma keying in the custom layout editor. The chroma keying options appear.

White, grey, and black are not recommended colors for chroma keying. Pearl-2 treats them as the same color with different luminance values. As such, chroma keying affects all shades ranging from white to black.
- Click the eye dropper and then click on a color in the thumbnail image to choose the chroma key color.
The background video image shows through all the colored areas on the chroma key video layer that match the color you select as the chroma key.
- Adjust the chroma color selection and blend the edges to remove unwanted chroma effects or residual color.
- Enter a number in the Key threshold field to adjust the color selection. A value of 0 equals the original color you selected. A higher value widens the range of the selected chroma color. A lower number narrows the range of the selected chroma color.
- Enter a number in the Edge blend field to smooth out and adjust the color around the edges in your image.
- Click Save when you're done.
